Showing posts with label Desserts. Show all posts

Sunday, February 10, 2013

bundt cake!

We survived the plague. I made more than three huge batches of chicken soup and bone broth, forced tons of fluids on the boys, and used lots of lavender and peppermint essential oils. But they're both better!

...and now I'm getting sick. *sighs*

It strikes me as amusing, how masochistic I must be. I take on assignments and odd jobs and projects with no problem, and then panic when I realize how little time I have to accomplish it all. I have two sewing projects to accomplish sooner rather than later, an event that my hubby and I are in charge of some of the activities and we need to plan for, and we're working on slowly remodeling/organizing our garage and laundry room. (laundry room being the fancy term for the guest bathroom that has a washer and dryer behind the broken door) And with all these projects going on, our little one has learned how to crawl and pull himself up to standing.

Somehow I feel like I have no time in the world to get everything done. And that's silly, as I have a full 24 hours EACH DAY to get stuff done! I have horrendous self control these days. And then I complain that I haven't got enough time to get everything done. Today at church we had a guest speaker who was talking about time and how we use it or don't use it. It definitely struck a cord in me. How often do I complain to my hubby that I haven't got enough time-but I got halfway through the book I was reading, had time to peruse Target with my Mom, and aimlessly play with the baby? I could've used that time so much better! Get some laundry started, play with the baby while it's running, work on sewing while he's napping, get dinner started (woot woot for crock pots!), run the dishwasher while running errands... Ugh. Now you now what you can pray for me about!

we took time to really play with our little guy before his bedtime. love that smile!

Yesterday was a busy day. TG had band practice in the morning, we had a wedding reception right after, and then when we got home I had a bunch of cooking and baking to do for today's All Church Lunch. I made a bunch of meatballs and made the most amazing bundt cake. The normals were getting a rare treat of baklava for dessert today, and I wanted cake, so I made cake for us specials. And I've got to share the recipe. It's delicious! (and if I don't share it, I'll likely lose it, and that'd be positively depressing!)

Chocolate chip bundt cake of YUM
  • 1/2 cup sorghum flour
  • 1/2 cup rice flour
  • 3/4 cup potato starch
  • 3/4 cup tapioca starch
  • 1 teaspoon xanthan gum
  • 1 1/4 teaspoons baking soda
  • 3/4 teaspoon baking powder
  • 1/2 teaspoon salt
  • 1 1/4 cups sugar
  • 1/3 cup coconut oil
  • 2 eggs
  • 1 Tablespoon vanilla extract
  • 1 cup coconut milk (buttermilk style)
  • 1 package dairy free mini chocolate chips
How to make this YUM:
1.) Preheat oven to 325° and spray bundt pan with non-stick spray
2.) Sift all the dry ingredients together
3.) Pour the cup of milk into a bowl, and add a tablespoon of lemon juice or vinegar to it. Set aside.
4.) Blend remaining wet ingredients together. (eggs, vanilla and oil- and yes, if the coconut oil is room temperature, the wet ingredients AND batter will be slightly lumpy. No worries)
5.) Slowly start adding the dry ingredients to the wet, alternating with the (buttermilk-esque) coconut milk. Blend thoroughly.
6.) Add the entire package of chocolate chips. Yes, the whole package. Stir in gently.
7.) Pour the batter into the pre-sprayed bundt cake pan, and slid into the oven to bake for 50ish minutes.
8.) Once the toothpick test declares it's done, pull that baby out of the oven and let her cool for a few minutes before flipping onto whatever tray or cake carrier you have.
9.) Cool the cake for awhile longer, and then lightly dust it with powdered sugar. Enjoy!

My hubby confessed to eating more than 3 slices today. ...I had more, so I can't really be too perturbed. This is a recipe that if you want to make it chocolatey, it wouldn't be too hard to reduce some of the flours and use cocoa powder to make it chocolatey. Or, if you want it lemony, grate some lemon rind into the batter, and use a bit of lemon juice straight into the batter as well. (and top with a lemon glaze!) This is a yummy cake that is rather simple-and has so many possibilities! If you want a rainbow funfetti type cake, sub out the chocolate chips with a tube of sprinkles. Play with it. Own it. Eat it and don't weigh yourself on your bathroom scale then following morning.

Any creative ideas out there on what else can be done to this cake?


Friday, January 25, 2013

Sickness and peanut butter

It's finally happened.

Our little one has gotten sick.

He almost made it 10 months without any illness! Alas, for my hubby caught a cold or something from his employee, and that made it's way to That Boy. We've been mostly battling just a fever. But still, a fever of 102.8 is still quite a new thing to battle! He's been handling it ok-ish. As long as I'm constantly holding him. And as long as he has his paci. Or is nursing. ...it's been a long few days.


Mama's little sickie

But my hubby is doing a bit better! His fever has been fluctuating a LOT, and all our Tylenol expired ages ago. (we use it sooo often. Our bottle expired in 2009 and we haven't used it since then to even notice!) Thankfully I've been doing more homeopathic stuff, and we've discovered that for sleeping purposes, a damp washcloth with lavender and peppermint essential oils dabbed on it help to reduce the fever and relax him. Huzzah for that!

So what's a Mama gonna do, with two sickies in her house to take care of? How is she supposed to keep functioning?

Well, I've discovered Pinterest. Finally. And I found the most amazing recipe EVER. Averie of loveveggiesandyoga has this amazing, amazing recipe for peanut butter chocolate chunk cookies. And they're naturally gluten free! No flour! I want to share them with my neighbor, but her daughter is allergic to eggs. I'm stubborn, these cookies are amazing, and they MUST be shared! So I altered the recipe.

Behold, the tweaked recipe for egg free scrumptiousness!

1 cup peanut butter
1/2 cup honey
1/2 cup brown sugar
1/4 cup applesauce
1 TBSP vanilla
1 tsp baking powder
4 tsp coconut flour
4 oz dark chocolate bar

1.) Preheat oven to 350
2.) Mix all but the chocolate together well.
3.) Chop chocolate in chunks.
4.) Mix into batter. Pour into a container and fridge it for a minimum of 2 hours. (you can fridge it up to 5 days)
5.) Roll dough into balls and drop onto a cookie sheet that's covered with a parchment paper.
6.) Bake in preheated oven for 13ish minutes.
7.) Cool for 5 minutes.
7.) ENJOY


And here's the original recipe, so you can peruse her blog of yummies! Go make these cookies. Now.
http://www.loveveggiesandyoga.com/2013/01/peanut-butter-chocolate-chunk-cookies.html

Saturday, October 13, 2012

Coconut!

So...I'm supposed to be on a cleanse diet.

No grains, no sugar, no eggs, no dairy...

Lots of veggies, fruits and meats...

...I feel like I'm dying without my chocolate and carby goodnesses!!!

What's a Mommy gonna do? I've started getting desperate, and been looking up coconut recipes. (for the record, coconut shavings are the most horrible food thing ever. I have texture issues, I know.) Well, dislike for coconut shavings aside, I'm desperate. I've got no problem with coconut flour. Or coconut oil. Or coconut butter. But shavings? Yeah, no thank you.

...so I bought coconut shavings today...and used them...and dude, have I got a recipe for you!

I was originally going to make coconut butter from scratch. But I got impatient and decided I'd just find something to do with coconut meal instead. (10 cups of coconut shavings in a food processor for about 10 minutes will yield some very fine coconut meal, for the unofficial record) I was curious. I was desperate. I made brownies!

Behold, coconut meal!

Similar to zucchini brownies, moist, decadent, and you've no idea that the yum in your mouth is healthy! I made them (with fervent prayers during the mixing, baking and taste testing) and served them to my hubby. He thought they were amazing! He's been doing the same as I all evening-snitching little bites here and there. Thankfully we'll have enough to share in our fellowship group at church tomorrow. Which is good, because that's the only reason I'm really able to make these while on a cleanse! (they have egg, which is a no-no for the cleanse diet, BUT everything else is acceptable!) I ended up making 3 batches of these brownies for tomorrow, and boy, are they good!


Shall I give this recipe? Or shall I hold ya'all in suspense? (for, like, the two of you who still follow a blogger who blogs every month, lol)

Here's the yum!

2.5 oz of dark chocolate (or all but 2 squares of a bar of chocolate)
1/2 cup coconut oil
2 eggs
1 cup coconut sugar (also known as palm sugar. You can use regular cane sugar if you'd like)
1 tsp vanilla
1/4 tsp sea salt
3/4 cup fresh coconut meal (not flour, not shavings. Meal.)
2 TBSP coconut flour

  • Pre-heat oven to 350. If not using seasoned stoneware, spray non-stick in a 8x8 pan.
  • Melt dark chocolate and oil on stove top in small pan. Stir together, and then remove from heat.
  • Once cool, blend eggs, sugar, vanila and chocolate together.
  • Add the remaining dry ingredients. Mix well. 
  • Pour into pan and bake for 25-30 minutes, or until toothpick comes out clean. 
Gah, so good! I'm kinda glad our little one can't eat brownies yet. I wouldn't want to share! But he IS starting solid foods...so the time is coming quickly. Thankfully he's content thus far with zucchini and carrots and whatnot. Assuming Mommy gets her act together in the morning and makes it, he'll be trying out spinach tomorrow! But Mommy needs to make that first...

Well, I posted the recipe, huzzah! Time to crash, as there's a very good chance a certain little one will be waking in a few hours for a snack, and Mommy wants to get some sleep before then! Being a 6 month old boy, he's sure growing fast! *sniff, sniff* My little baby is growing too fast! Wah!

Look! He's even got two teeth growing in! Ayiee!

Saturday, April 23, 2011

Easter is tomorrow! Yay!

Easter is tomorrow. Where did the first quarter of 2011 go?! How did we get to Easter so soon?! As a child, I never believed the adults that would tell me that time will fly by as I get older....now I want to go back to the point in my life that time used to crawl. The hours in the day are a blur, and somehow I'm still trying to keep all my plates spinning!

Thankfully, in just a month or so, one of those plates can come off for the summer. In it's place, I'll be adding a new plate to spin-sewing classes! I've been sewing for about 12 years or so, and have decided that over summer, it'd be fun to teach some sewing classes. Nothing fancy, but enough that people learn how to use a sewing machine, read a pattern, make things they want, etc. It'll be fun. And I'm hoping it'll still let me have more time on my hands to use for blogging recipes and whatnot. *crossing fingers* I've made so many diffferent recipes that I don't know where to start up from. Ugh.

For now, I'll just talk about Easter a bit. Tomorrow will be yummy! Honey ham, green bean casserole (recipe from Thanksgiving), potato's O'Doyle (aka potato's o'bryan), dinner rolls, orange jello with mandarin oranges and curried sweet potato gratin. I like the idea of having classics at holidays-but also having a different dish, just to try something new and see if that will become a classic. Which is why we're having curried sweet potato gratin. It's a new recipe that I found from Gluten Free Girl- http://glutenfreegirl.com/curried-sweet-potato-gratin-with-a-vegan-option/#comment-30676  It looked so good, I just had to try it! So that's what's going on in my kitchen at this moment in time. ^_^ I made my green bean casserole this morning. Whew!

Because we have church tomorrow morning, and then we have our Easter dinner, I have a few cheat methods when it comes to baked goods. (we all know that baked goods taste best fresh, right?) I mix my flours and all dry ingredients in advance. For my dinner rolls for example, I just need to mix in the wet ingredients tomorrow at my parents and let them rise. After they rise, roll into rolls, let rise, bake. Done! Same thing for tomorrow's dessert. Best thing ever. ANGEL FOOD CAKE. And it's not like that store bought angel food cake that's meh. No, this is amazing. I made it for our Bible study a few weeks ago. I'm the only gluten free person in the room. Everyone agreed it was the best angel food cake they had ever tasted. YAY! And this is another recipe I got from someone else- Gluten Free Mommy. She has some great dessert recipes if you're ever hankering for sweets! http://glutenfreemommy.com/angel-food-cake/

Once I finish with all my casserole and dessert making, I'll try to remember to take a few pictures to post. Can I say it? I'm looking forward to tomorrow! A holiday to celebrate our Savior's death and defeat of sin with His resurrection, a holiday to hang out with family, a holiday to eat good food. Yep, tomorrow will be awesome!

He is Risen!
 He is Risen, indeed!

Tuesday, December 14, 2010

More cookies!

Self control. I lack it.

A week or so ago, my nutritionalist gave me permission to try having wheat, sugar, dairy, corn and oats again if I so desired to. But I was to ease into it, maybe a week of adding in ONLY sugar. See how my body handles it, and then go off it and try a week of just wheat, see how I handle that, etc. So then we can catalog what I react to and how I react to it, and if I think it's worth it to eat ____.

Well....I got a few days of only sugar...then I added dairy, as I was simply dying to have yogurt and kefir again. Anddd then I went to my friend's Christmas party. Any pretense at self control simply flew out the window! She had made this amazing chex/pretzel/M&M/melted marshmallow mix..it was soo good. I could feel the stomach ache coming on, but my tastebuds overruled my common sense, and I ate almost every cookie in sight....the next morning, I woke with not one, not two, but FOUR cold sores on my lips, a horrible stomach ache, a headache, and all my joints felt like my arthritis had come back. It's been amazing. *note, sarcasim in the last sentence* I've gone back off wheat-and my joints, stomach and head have gone back to normal. Today, at another Christmas cookie event, I just had to try two peanut butter blossoms. (I wanted to compare to the taste/texture of the cookies I just made) They were good. And sat like lead in my poor stomach. My elbows and fingers have been hurting since this morning, and my head has had a mild throb to it.

Thank you Lord that it so far seems I can have small amounts of cane-sweetened yogurt!

So now I know. I am officially and utterly staying as wheat/gluten-free as I possibly can. I'm not going to panic about mild cross-contamination. But I am not having baked goods, soups with wheat, cereals, etc ever again! At least, as long as my self-control holds out. It's amazing-I know how awful it'll make me feel, and my tastebuds take over! I really have to work on this problem of mine. If it affects only myself, I don't have much issue with it. But when it affects how I treat those around me? How I treat my hubby? How much housework I can get done? That's a problem. And I refuse to let my own sin (lack of self-control) rule me! Feel free to pray over my newest problem...

But the good news out of all this? Snickerdoodles. Snickerdoodles and white chocolate macadamia nut cookies. They rock. I plan to make more tomorrow and bring them to families that need happy gastronomical delights. ^_^


Snickerdoodles

½ cup (1 stick) unsalted butter
1 Tbsp ground cinnamon
3 Tbsp sugar
½ cup shortening
1 ½ cup coconut sugar (or white sugar)
2 large eggs
1 large egg yolk
2 tsp vanilla extract
2 tsp cream of tartar
1 tsp baking soda
½ tsp salt
1 tsp xantham gum
465 grams of TG's all-purpose flour (or you can use-1 cup sweet sorghum flour,  cup superfine white rice flour, 1 cup millet flour and 1/2 cup tapioca flour/starch)
  1. Preheat the oven to 350
  2. Combine the cinnamon and 3 TBSP of the sugar and set aside for future rollage!
  3. Blend the shortening and butter, and then add the sugar. Once it's light and fluffy-ish, add the eggs. Scrap down the sides with each egg, making sure it's mixing fully. Add the egg yolk and vanilla.
  4. Now the cream of tartar, soda, salt and gum get added. Beat in the flour mix.
  5. Roll the dough in a ball that's a good size to your eye. (I recommend about an inch or so around) Line your cookie sheets with parchment paper. After you roll the dough into balls, roll it in that yummy mixture of sugar and cinnamon. Place on cookie sheet.
  6. Bake! About 12 minutes or so. You want them to still be soft in the center and the tops just starting to crack a little. Don't overbake-but also don't underbake. (I know, that's so helpful) Let them cool before moving them.
  7. Enjoy!
Roughly 50 cookies- 100 calories and 14 carbs apiece

I think they're pretty good cookies. But I feel like they could be better. TBG thinks they're fine-which is good, but I still feel like there's SOMETHING missing or SOMETHING that could be just a tiny bit better. Let me know if you think of what it could be..


But now for the cookie that I think rocks. My new favorite. For this week at least... The white chocolate macadamia nut! Woohoo! This cookie is actually a couple alterations tossed together. It was originally a recipe from Gluten Free Girl for ooey gooey chocolate chocolate chip cookies. Which are good. I will admit that. But...I wanted a good cookie dough that I could add nuts and chips to. And I got it! So here's my recipe for the new cookies:

1 1/2 cups sweet rice flour
1/2 cup tapioca starch
1/4 cup millet flour
1/4 cup teff flour
1 tsp baking soda
1 tsp baking powder
2 tsp salt
1 stick salted butter, softened
1/2 cup coconut sugar (or brown)
1 cup coconut sugar (or white)
3 eggs
1 TBSP vanilla extract
3 large handfuls macadamia nuts
1/2 bag white chocolate chips

  1. Line your sheets with parchment paper. (This is so standard with gluten free baking, I don't know why I say it still!)
  2. Mix the flours, soda, salt and powder. Measure it accurately-every little bit counts!
  3. Cream the butters and sugar(s). Add eggs and vanilla. Slowly add in the flour, and make sure it's mixed fully.
  4. Add in the nuts and chips! Now fridge it all for at least 15 minutes. Preheat the oven and walk away.
  5. Walk back.
  6. If you want them to be gooey, then make the cooke dough balls large-like the palm of your hand.
  7. Bake them for 12-15 minutes. (depends on the cookie size and your oven temp) The tops should be slightly soft still. Let them sit on the cookie sheet for a couple minutes before moving or consuming. Enjoy!

When I make them big-I only get 30 some cookies. And they have a fairly high cost for that- 207 calories and 20 carbs each. But if you make them smaller. (ie, average size, where the dough is about an inch wide or so) And you can half the cal/carb amounts. But who wants smaller cookies?...

I really don't want to think of how many cookies or carbs I've had today. I'm making cookies for work tomorrow-and I'm only making enough to bring to work and for the others. Depending on what time TBG gets off work, maybe I'll hit up the gym on the way home..maybe.    x_x

Wednesday, December 8, 2010

Cranberry Bread and Peanut Butter Blossoms

How has so much time passed?! It's already December and I haven't yet blogged once this month! *bows head in shame* I blame my schedule...

Another shameful thing: my cooking. I've been baking so much amazing stuff that I've gained weight. >_< At least 5 pounds...after how good I'd been, counting carbs, eating healthy, losing weight..holidays come around and the kitchen always smells good and food is amazing and I need to confirm that everything I make tastes good! I'm kinda looking forward to January now, as then I won't feel the need to bake cookies or bread or brownies or sweets every day.

Oh well. At least everything I'm making, I can eat! ^_^

I've had a couple requests for this recipe, so I'm blogging it before I forget to write it down! Cranberry nut bread. Back in the day, I did NOT like cranberry bread. I did NOT like fruit in bread or baked goods. I did NOT like nuts in anything baked. My oh my, has that changed!


This is a lovely, moist bread with juicy bites of cranberry, the crunch of pecans, and the lovely sweetness of Christmas. Perfect as a dessert bread with coffee, or as a breakfast bread on the side of some scrambled eggs. It's healthy-and has just enough sweetness to be versatile. I'm astounded with how much TBG and I like it, as we didn't used to be people who'd enjoy such a thing. But now we are. Amazing how our taste buds have adapted and learned to prefer such things. (but don't worry, our chocolate addiction is still going strong!)

Cranberry Nut Bread

1/2 cup teff flour
1/2 cup sorghum flour
1/2 cup TG's all purpose flour
1/2 cup tapioca starch
3/4 cup coconut sugar
1/2 tsp sea salt
1/2 tsp baking soda
1 1/2 tsp baking powder
1 tsp xanthan gum
1 TBSP orange zest
3/4 cup orange juice (it does taste better when it's fresh, hand squeezed orange)
1/4 cup unsalted butter
1 TBSP mayo
2 eggs
1 cup cranberries (I prefer half the cranberries whole, and half the cranberries quartered)
3/4 cup pecans, chopped
 
  1. Preheat the oven to 350 degrees.
  2.  Sift all the dry ingredients together. Zest counts as a dry ingredient today. 
  3.  Mix all the liquid ingredients together in a separate bowl.
  4.  Add the two (wet and dry) together. Mix well.
  5. Now for the fun part-add the cranberries! I'd say add about 3/4 of the nuts, so you can sprinkle some on the top of the bread. Or, if you're a nut dork like me, add ALL the nuts to the bread, and chop up more nuts for the top. ^_^
  6.  Pour the batter into your pans. If it's one large loaf pan-45 minutes of bake time. If it's 4 smaller loaf pans, then about 25 minutes.
  7.  When an inserted toothpick comes out clean, bring out of the oven and allow to cool for about 10 minutes. Then cool for a bit longer out of the bread pan.
I will say-the flavors are even better the next day! All the times I've made it to bring to people I've made the same day, so it hasn't had time to set to the even richer flavors-but that's because if I made the day before, there wouldn't be any bread to share! Enjoy the bread straight up with some coffee or tea. Enjoy it warm with some butter melted into it. Drizzle on some honey. No matter how you eat it, it tastes good. 70 calories and 10 carbs a slice. Roughly 35 small slices from mini loaf pans.


And the other new recipe is my personal favorite. But that's because I've always loved my peanut butter and chocolate. Peanut butter blossoms. *ooohh* Soo good! I am going to play with the recipe a tiny bit, see if I can infuse a teensy bit more moisture into the cookie. As it is, it's good. But I want to make it better. Not that I'm a baking perfectionist. ...but I kinda am.

The great part with this recipe is you can make two ways. One way, the traditional way, is with hershey's chocolate kisses.

The other way, the new way, is for those of us who can't have the dairy and sugar in the kisses-use unsweetned carob chips and lightly drizzle a tiny amount of honey on the chips. Mmmm...does it work well!


Either way, they taste great! I'm also thinking I may try melting down the carob chips, adding some maple syrup to make it smooth and sweet, and then pouring a bit into each well of the cookie. That could be really good too! (guess what I plan to try next Tuesday?..) ^_^

But, before I forget, let me give you the recipe, so you can try it at home too, and let me know what you made!


1/2 cup white rice flour
1/2 cup brown rice flour
1/2 cup + 2 tbsp potato starch
1/4 cup tapioca starch
1 3/4 tsp xanthan gum
1 tsp sea salt
1/2 tsp baking soda
1/2 cup solid shortening (I used butter flavored Crisco)
1 cup coconut sugar
1 large egg
2 tbsp coconut milk
1 tsp vanilla
1/2 cup peanut butter (the original recipe called for smooth pb. But I like mine crunchy. You can use whatever you prefer)
Chocolate kisses, unwrapped OR carob chips and honey

  1. Preheat oven to 350. Grab your cookie sheets and line them with parchment paper.
  2. Mix the dry ingredients-flour through to baking soda.
  3. In a stand mixer, or with a hand mixer, beat sugar and shortening into one cohesive lump of yummy. Add the egg, coconut milk and vanilla. Once that's blended in, add the peanut butter. (and don't start drooling over the mixer. I KNOW the peanut butter smells amazing, but resist!)
  4. Slowly add in the dry mix. Once it's all mixed together, roll the dough into small balls and place onto the cookie sheet. (I made my balls into a bouncy ball size)
  5. Either press the unwrapped kiss into the cookie dough, or use a knuckle to create a well in the dough. Sprinkle in some carob chips, and drizzle with honey.
  6. Once all your cookies are on the sheets and ready to go, bake for 15-20 minutes, or until the edges of the cookie get ever so slightly golden.
  7. Cool. And enjoy. ^_^
Makes about 36 cookies. 95 calories and 11 carbs a cookie of peanut butter goodness. If I do indeed change the recipe and make it better, then I'll re-post it.

Well, TBG's fresh loaf of sandwich bread just came out of the oven. Going to let it cool a bit, then slice it and freeze it for this week and next week. Then I'm going to change the sheets on our bed, do a load or two of laundry, eat some lunch, and run out the door for work! Busy busy. It's a good season. We are so blessed, are we not? Enjoy what the Lord has blessed you with-it is abundant!

Sunday, November 14, 2010

Cookies!


For some reason, I've been craving every single carb-y thing that's bad for me lately. Donuts, bagels, cake, cookies, bread, pasta... So far, I've succesfully made the cake, cookies and bread. I buy really yummy brown rice pasta. I have a recipe for donuts. And I have a recipe for bagels. (soo gonna try the donuts sometime soon!)

But when I was reminded that I had signed up to bring 3 dozen baked goods today, I knew I had to make cookies. I wasn't too sure which kind of cookie I wanted to make, but I knew I wanted cookies. So I looked around a bit, and then decided. I was going to make the spicy molasses cookies that Shauna makes (gluten free girl and the chef) and I was going to make the apple quinoa cookies with dates and walnuts that Natalie makes (gluten free mommy). I hit it right on. The cookies are very different-and soo good in their own unique way! My hubby loves the molasses cookies. I prefer the apple quinoa cookies. (Which is funny, because those are the closest I can get to an oatmeal cookie right now. Even though, a year ago, I HATED oatmeal cookies!)  My parents really liked the molasses, our friends from Bible study really liked the apple quinoa. Everyone really liked both-but they each had their preference. Fine by me!

This Thanksgiving, I'll be making an apple pie and molasses cookies. I think that sounds most excellent. ^_^ And we'll see what we cook up for Christmas... For tonight's Bible study, I'll be making more fresh cookies-both types-as well as bringing some tart green apples to lightly bake with maple syrup and mapled pecans. Tonight will be LOTS of food for only 6 adults. (granted, we'll have a 1 year old, and 2 preggo ladies, so that's gotta count for something, right?...)

I really do hope that these posts can encourage anyone who's new to gluten free. I'm still learning as I go, but hopefully this will give a bit of a sounding board to spring from! And maybe, someday, I can grow my Pampered Chef business into something that's more directed just for the celiac community and the lactose free community, and all the different groups with allergies. I know I'm tired of going to events like that where I can't eat anything! I can't be the only person out there like that.

But cookies. That's what we want for today. Just cookies.


Spicy Molasses Cookies

3/4 cup sorghum flour
1/2 cup tapioca starch
1/3 cup potato starch
1/4 cup sweet rice flour
1/3 cup arrowroot
2 teaspoons xanthan gum
1/2 teaspoon guar gum
1 3/4 teaspoon cinnamon
1 teaspoon ground fennel
1/4 teaspoon cloves
1/2 teaspoon baking powder
1/2 teaspoon baking soda
1/2 teaspoon salt
1/2 pound unsalted butter, softened
1 cup coconut sugar
2 eggs
1/4 cup molasses


  1. Combine the butter and sugar. Once that is incorporated, add the eggs, and then drizzle in the molasses. Once that's fully mixed, stop the mixer. (if using one)
  2. Combine all the dry ingredients in a separate bowl. I highly recommend sifting it all together, but the world won't implode if you don't.
  3. Slowly add the flour to the wet mix. (you can turn on the mixer now) Mix thouroughly.
  4. Now the hard part. Put that dough in the fridge. For at LEAST an hour. It's best if overnight.
  5. Once enough time has passed, preheat the oven to 350.
  6. Line your cookie sheets with parchment paper. Roll the dough into balls about a tablespoon size. I use the palm of my hand to gently squish them down slightly, so they don't roll off my sheet. Place the balls about 2" apart.
  7. Bake for 15 minutes. They should be slightly browned on the edges, and have a bit of "give" in the center. Remove from oven and cool for 15 minutes before transfer. I slide the parchment paper off the cookie sheet and onto the cooler counter top to help cool them faster if in a hurry.  
  8. Allow to cool a bit more. Grab a mug of coffee (or milk for you people's who can) and dig in!

When you make them into small balls, you can get about 54 cookies, at 60 calories and 7 carbs apiece!

Want to check out the original recipe? http://glutenfreegirl.blogspot.com/2009/11/34-cup-sorghum-flour-12-cup-tapioca.html  Shauna is amazing! And speaking of amazing, she and her hubby Danny are pulling together tons of gluten-free recipes for Thanksgiving! TONS! If this year seems a bit darker and more depressing because it's a first time around for the holidays, you have GOT to check out their blog! I promise you, you will not be disappointed. It has been a very bright spot of warmth and encouragement, and has really blessed me with coping through the last couple months! Say yes. It is possible. And if you try out any of the recipes, or post your own recipe, link it to this post-http://glutenfreegirl.blogspot.com/2010/11/gluten-free-thanksgiving-2010.html . They have a raffle going on for items to help start the newbie gluten free chef. They announce winners next Monday, the 22nd. Can we say awesome power couple?!

And you have to check out their cookbook! It has been phenonomal. Remember that pumpkin soup recipe I made? It's from that cookbook. (only, the recipe in the cookbook doesn't have my dairy-free substitutions. Which means it probably tastes even BETTER than what I posted!) Pear apple tart. Aoili dip. Breakfast recipes. Dinner recipes. Recipes that I can read and understand and make. And it's a story too-how she got diagnosed, how they met, how they married, and eventually the newest blessing in their life-little Lu. I HIGHLY recommend asking for that book for Christmas! For gluten-free folk and those who are not-the food is superb and you'd never be able to tell the difference! Go add that book to your wishlist. Now. And then come back and finish reading this post. ^_^

And I'm making it super easy. You can't say you couldn't find it now-I've even got the link for you!


And now that you've done that, here's the other cookie recipe of goodness and delight. My new favorite, the apple quinoa+d+w. My new name for it. Because otherwise it's too long to write out! *laughs*


Apple Quinoa+D+W Cookies

1/2 cup sorghum flour
1/2 cup brown rice flour
1/2 cup tapioca flour
1 teaspoon pumpkin pie spice
3/4 teaspoon xanthan gum
3 cups quinoa flakes
1/2 teaspoon salt
1/2 teaspoon baking powder
8 oz. pitted dates, chopped
1 cup walnuts, chopped
1 cup apple, chopped
2 cups coconut sugar
1 cup butter
2 eggs
1 teaspoon vanilla

  1. Beat butter and sugar until combined, then add the eggs and vanilla.
  2. Keep the dates, apple and walnuts separated for now.
  3. Mix all the dry ingredients together in a separate bowl. Slowly add the dry to the wet, mixing constantly as you go. Add in the dates, apple and walnuts. Once it's just mixed, you're ready.
  4. Fridge for an hour or so.
  5. Preheat the oven to 350 and pull out that dough! Line the cookie sheets with parchment paper. Roll the dough into 1-2 TBSP sized balls. I made mine small, but then I had more cookies to eat. ^_^ Bake for 15-20 minutes, depending on your oven. Once the edges of the cookie starts to turn brown just slightly, they are done and ready to be pulled out. Allow to cool before transfer and consumption.
When I made my batch, and I admit I made the cookies smaller, I got about 60 cookies from the batch. Those were 110 calories and 15 carbs each. And if you want to see Natalie's original recipe: http://glutenfreemommy.com/apple-quinoa-cookies-with-dates-and-walnuts/ I really like alot of Natalie's food posts. I'm just sad because she hasn't posted anything new in quite awhile. I'm really hoping everything is ok with her and the family..


These women are amazing. It is thanks to ladies like them who blog that I get recipes and recipe ideas and can enjoy life as a gluten free woman. Thank you Lord for blogs and people with creativity! ^_^

Sunday, November 7, 2010

More fun with zuccini...there's just something about that veggie!


Moist, fudgy, amazing goodness!


I confess I sometimes wonder if anyone reads this blog...just because few people comment...but then I check the stats, and discover that it IS read! Yay! ^_^

Yesterday I wanted to use up the last of my baseball bat sized zuccini. It was so huge...but I successfully used it up! And in a most delicious way too. First, I made another batch of zuccini muffins. This time I made only muffins with cranberries, and then  muffins with nuts. (TBG loves the nuts best, but the cranberries are our second favorite) I took some to a friend's house for a pre-dinner snack, froze some, and took the rest over to another friend's house. Gotta share the love a bit!

There was another thing I took to both my friend's houses. What I used the last of the zuccini on. Zuccini brownies. Don't make a face! They were the best! So fudgy, rich, thick, soo not unhealthy tasting! So delicious by themselves. Amazing when heated up slightly, and with a scoop of vanilla ice cream on top of it! (mind you, for us dairy-free peoples, our ice cream is Vanilla Rice Dream, tastes just like a vanilla ice cream and sooo good!) That Bearded Guy and I were melting into our chairs. Best dessert ever. We were shocked with how amazing they were. And the best part? They are less carbs and calories than the peanut butter brownies, so I can eat more of them! ^_^ Just what I needed for pre-holidays!

And it was really rather lovely, before, when I'd grate zuccini or anything, I'd use my hand grater. But this time, I used my mandolin slicer that I got with my work supplies. And this doesn't scare me like my old mandolin slicer-this has a much better food gripper thingy! It made quick work of the zuccini, and my fingertips weren't tingling with fear like they used to. (I kinda sliced my finger really deep another time on my old mandolin slicer. I've been scared of the things every since) Yay for a new kitchen toy tool!

I found the recipe online, and it wasn't a gluten-free friendly recipe. Nor was it lactose-free friendly. Or diabetic friendly, for that matter! But I changed that baby around and made it perfect for our consumption. *woot*

And now you can enjoy some lovely, semi-healthy, gluten-free, dairy-free brownies for your households consumption!


1 cup coconut sugar
1/4 cup unsweetened applesauce
1/4 cup coconut oil
1/2 cup sorghum flour
1/2 cup tapioca starch
1/3 cup brown rice flour
1/3 cup white rice flour
1/3 cup sweet rice flour
(if you want, you can use just 1 cup of any rice flour, the blend is best, but if you don't have time or all the flours listed, it is a completely viable option)
1/4 cup cocoa
2 cups shredded zucchini
2 teaspoons vanilla extract
1 teaspoon salt
1 1/2 teaspoons baking soda
1 cup carob chips
1/4 cup maple chips

  1. Preheat oven to 350 and spray your 8x11 brownie pan of choice.
  2. In a mixer, blend the sugar, oil and flour until it resembles wet sand. (and it will!) After it resembles sand, keeping the mixer on low, add cocoa, zuccini, vanilla, salt and baking soda. Once it's fully incorporated, add in the carob chips.
  3. Pour brownie batter into pan and bake for 25-30, or until an inserted toothpick comes out clean and brownies appear set.
  4. Let cool fully before cutting. If you have the patience. It'll look a bit messy if you're impatient. Just FYI... >_>
Serves about 35. 80 calories and 13.5 carbs each. YAY!

 Oh, and as a note, the maple chips give little bursts of sweetness-and they are the lighter colored flecks in the brownie pictures. We've yet to actually find a strand of zuccini. It just melts into the brownie!


With the ice cream of immense yummy-ness!

Saturday, October 23, 2010

Autumn weather and Autumn drinks

It's feeling like Autumn again, and this is the season for hot, steamy drinks and cuddling on the couch with kitties. Unfortunately, there's only so much tea I can drink before I start really craving my Starbucks. Specifically, the pumpkin latte and the caramel macciato. Now, I've yet to figure out the later drink, but I did come up with a feasible pumpkin latte! The main difficulty is that all recipes I looked at online or through friends used pumpkin flavored syrup-and that involoves corn syrups and sugars. And to further complicate it, it's a drink that is at its best creamy peak with heavy cream. *le sigh*

For the moment, I am content with my pumpkin spice latte recipe. But I figure that will change soon enough, once I've had enough time to think about it. In the meantime, I'll post the recipe and get input on it. If anyone has any suggestions or personal recipe improvements, let me know!

(Serves 2)

‎1/2 cup pumpkin puree
2 cups almond milk
1 1/2 tsp vanilla
1/2 tsp cinnamon
1/4 tsp allspice
1/4 tsp ginger
1/4 tsp nutmeg
1/8 tsp clove
dash of mace

Toss all the above into the food processor and blend well. Then pour it into a small saucepan on the stovetop, and heat for about 10 minutes on low. (do NOT boil! That will destroy flavor!) After it's fully hot and yummy smelling, pour into 2 mugs and serve. If you're allowed dairy and sugar, dollop some whip cream on it, and then sprinkle lightly with cinnamon. If you have texture problems, you will want to strain the drink before serving, just fyi..

The calorie and carb count will vary, depending on the milk you use.. just know that it is in the 420-580 range for calories, and 15-18 carb range.. But it's worth it! (at least, it is when you can't go to Starbucks..)


Someday I'll get a bigger food processor...

Note how it's simmering, but not BOILING...
I did turn the heat down after the picture..

I am ready for Christmas music!

Monday, October 18, 2010

Who knows the rain dance?...

...can they teach it to me please?

Finally. A chance to sit down and write! I have quinoa millet bread in the oven to rise, dinner is already planned and ready to go, and now, finally, a wee bit of time to blog! Huzzah!

But before I get to food. It needs to be said. TODAY'S WEATHER IS AMAZING!!! It is overcast, it is cloudy-I had SPRINKLES on my windshield this morning! I love autumn! I wish we had a real autumn more like this more often! (woah, I hope that last sentence made some sense...) Anyways, its rare to have actual weather here in southern california, and today is a gorgeous day. No bright sunlight, no obnoxious heat, no sweat.. ^_^ Someday we'll move to Seattle or somewhere with seasons...

One of the things that had bothered me with my new diet is that I can't have granola bars anymore. Which, even now, is true. I cannot have granola bars. Granola has oats. I cannot have oats. But I CAN have a yummy little energy bar that's a meal replacement type bar. These are healthy, these are tasty, these are actually rather satisfying! I created them completely and utterly on my own, and I have to say, I think they're pretty darn good if I say so myself. (of course, my hubby also thinks they're pretty darn good, otherwise I'd hesitate to post something about them!) For lack of a better name, they are currently called millet/flax energy bars. I will happily take suggestions on more clever names! Please, throw name ideas my way!

I actually had one today for my little lunch. When out and about on the road, they come in handy. Granted, this recipe I'm posting is not yet perfected. I need to make a batch again and tweak a few things so they'll stick together better. They can be rather crumbly if room temperature. We keep our bars in the freezer, and they are stupendous when freezer cold! I have crumbled a few bars and toasted them to make some granola to go over yogurt. That was good. Mmmm, yes, that was good. It's a versatile recipe. Play with it, make it into something of your own. Enjoy it.

2 cups crunchy flax (found in the gluten-free section as a cereal)
1 1/2 cups millet (not the flour!)
1/3 cups diced almonds
1 cup hemp seed
1/4 cup pine nuts
2 TBSP flax seed
1 TBSP cinnamon
1 tsp sea salt
1 1/4 cup almond butter
1 cup honey
1/4 cup butter, melted
1/2 cup applesauce

I plan to add next time:
1/2 cup quinoa flour
1 egg
2 TBSP flax meal

Mix the dry ingredients together first. Blend the wet ingredients together, then add to the dry. Mix gently. Pour into a pre-greased baking sheet, and smooth the top so it's flat. Pop into a pre-heated oven set at 350. Bake for roughly 20 minutes. The edges should look golden brown, and the center will look just done. Allow it to cool for a bit, and once its not baking hot, pop it into the fridge until it's completely cool. THEN cut into it and enjoy!

Makes 40+ servings. 170 calories and 17 carbs a serving.

The larger pieces are crunchy flax. The smaller, finer meal
is the millet. Just in case you were wondering.

Yay for almonds!
Done!


This one I added some carob frosting to. Mmmm..

And this is how it without the frosting. So insanely good!
Last night as TBG and I were laying in bed and talking, the topic somehow turned to food-strangely enough-and sweet potato's were mentioned. And after discussing sweet potato's and how awesome they are, we fell asleep. I dreamt of sweet potato's. I woke up this morning, craving sweet potato's. So what would any normal, sane, hungry woman do for her family's breakfast at 5am? MAKE SWEET POTATO'S, of COURSE! *maniacal laugh*

My one dilemna was that I had no idea what I could do with sweet potato's for breakfast. I did a bit of googling, did a bit of thinking, and I finally decided. KISS. Keep It Simple Stupid. Yep, at 5am, and with experimenting, we'd start simple. Somehow, it just seemed wise. (and I think it IS wise at that hour!) So I just used one sweet potato, 4 eggs, a glug of coconut milk, 1 tsp chili powder, 2 bacon, some diced onion and a few pinches of salt. It was lovely.

Here's what I did: cleaned the sweet potato really well, and then wrapped in foil. Tossed that baby into the toaster oven for a couple minutes to start softening it up. Let it cool a moment or two. Peeled it. Cubed it into small cubes. Cooked the bacon while the sweet potato was heating. Mixed up my eggs with the milk, chili and salt. Ripped up the bacon into small little pieces. Tossed the cubed potato and some diced onion into a buttered pan. Sauteed for a bit, until the potato was tender and the onions were carmalized. At that point I added the bacon and then poured the eggs over. Cooked and stirred until the egg was done, then served. Yummy! TBG and I were rather pleased with this "winner" of a recipe. Yay for successful experimentation at early hours of the morning! ^_^

Before I added the onion, I added a tiny amount of water
and put the lid on the pan for about 3 minutes. Smelled soo good!

Just added the egg. The smell of it cooking was divine!

A horribly lit image of what we enjoyed this morning. Mmm..
Thank you Lord for taste buds and such a lovely
variety of foods for our dining pleasure!

And one add on for today. Super simple apple dessert recipe. Here's what you need:

Green apple (tart!)
Maple syrup
Cinnamon
Maple pecans

Slice the apple thinly. Lightly toss with cinnamon until lightly coated. Place in small oven/microwave safe dish. Drizzle maple syrup over. If in a hurry, cook in microwave on high for about a minute, or until apple is tender. Or bake in oven at 350 for a couple minutes until apple is tender. (you can make this with as many apples as you want to make as much as you want) Chop pecans into small pieces. Add to the top and bake for an additional minute or two. Serve hot. If you can eat dairy, enjoy some with ice cream.

TBG and I love this. It's so super simple, and tastes great! It's a fairly healthy recipe too-it just depends on if you decide to drizzle or drown your apples in the maple syrup. ^_^

This dessert was inspired by apple pie during a fierce Skip-Bo match one night. ...my brain cells are always thinking about food. I admit it.


Good simple dessert

Thursday, September 30, 2010

The great snack dessert experiments

Graham crackers. Great for pie crusts, snacking on the road, frosting sandwichs and of course, S'mores...they are simply delightful. And also full of wheat, sugar and sometimes even dairy. I wanted to have a frosting covered graham cracker...but I couldn't. And that annoyed me.

So I searched around for a bit, and of course, ended up at Gluten Free Girl and the Chef's blog. I love her posts. And what did I find? An amazing recipe for graham crackers. Hallelujah! I tried it. And it's good. I'll post how to make it here, but you should also check her blog sometime, she's amazing. http://glutenfreegirl.blogspot.com/2010/01/gluten-free-graham-crackers.html

2.5 ounces sorghum flour
2.5 ounces brown rice flour, ground super fine, if possible
2.5 ounces tapioca flour
2.5 ounces sweet rice flour
1 teaspoon cinnamon
1 teaspoon baking powder
1/2 teaspoon xanthan gum
1/4 teaspoon guar gum
1/2 teaspoon salt
3.5 ounces unsalted butter, just out of the refrigerator
3 ounces honey
3 to 6 tablespoons cold water
 
  1. Measure out the flours and combine in a food processor. Yes, flours in a food processor. It's a good thing. Add the remaining dry ingredients and whirl it around until combined.
  2. Cut the butter in. Keep processing until it's fine and gritty. Similar to cornmeal.
  3. Combine the honey and 3 TBSP water in a separate bowl. Add the honey water to the food processor, and blend thoroughly. If it's not a soft and slightly wet dough, slowly add more water until you reach that consistency.
  4. Fridge the dough for about 15 minutes. Preheat the oven to 325.
  5. Get two pieces of parchment paper, and place one on the cookie sheet of choice. Grab that dough from the fridge, and lump it onto the paper'd pan. Place the other paper over it, and roll the dough until it's about 1/4 inch thick. Use a knife to lightly cut the dough into actual pieces. Save the scraps as they are-great for snacking or pie crusts!
  6. If you want to add cinnamon sugar to the graham crackers, now it the time to do it. If not, fridge the pan and dough for another 15 minutes or so.
  7. Bring out that baby and use the tines of a fork to add a little pattern to them. Bake for about 18 minutes or until they reach a lovely golden brown color, and are ever so slightly getting hard to the touch.
  8. Cool them for about 30 minutes or until they harden a bit more.
My lovely sis-in-law is letting me borrow her food processor-
she's so sweet!

That's the way you want the dough to look. If you want
cinnamon sugar graham crackers, I'd recommend adding some spice here

You can see I cut them to be s'more sized...Add the little hole decorations
at this point. And if you want them to be cinnamon sugar, add it here too
before you do the final fridging.

When I made them, with the sizes I cut, I made 26 servings, and they were 70 calories and 10 carbs each.

Now for the next step onward for my goal of s'mores. Sugar free marshmallows. I know, it sounds like an oxymoron, right? Well, it's actually quite simple to make, and they are so amazingly sweet! TBG and I were both very pleasantly surprised. And they melt very easily, so I'll be making rice krispy treats soon too. ^_^ I  may as well run with my fun! http://www.ehow.com/how_4735818_sugar-marshmallows-home-recipe.html This is the website I got it from-props to them!

What you need:
2 packets unflavored gelatin
1 cup agave nectar or maple syrup (I used maple syrup this time)
1 tsp vanilla
6 TBSP cold water
1/4 tsp salt

Pam spray
Sweet rice flour (or cornstarch)

  1. Mix gelatin and water in small bowl, microwave on high for 30 seconds.
  2. Add syrup, vanilla and salt. Using a handmixer or a standmixer, beat for 12 minutes, until it's tripled in size and became very thick.
  3. Spray 9x12 pan with PAM and lightly flour it. Pour the marshmallow mix into the dish, and cool in fridge (or counter top) for at least 3 hours.
  4. Cut the marshmallows into whatever size you want, using a wet knife.

I used a stand mixer, it's so much easier!

Use a wet spatula to smooth the top of the marshmallow before it hardens
I cut mine large, for the purpose of S'mores, and so I made 18 large marshmallows, at 48 calories and 12 carbs apiece. These are great for cocoa drinks, rice krispy treats, s'mores, whatever you'd use marshmallow sweetness for!

 We can't even begin to describe the joy our tastebuds experienced. We used carob chips for tonight's S'mores, and my oh my, were these the ultimate treat! Melt the chips on the graham cracker BEFORE adding the marshmallow. The heat alone from the cracker will melt the marshmallow-as you can see at the top of it. Oh man, were these good.

And using the graham cracker small tidbits with carob frosting on them! Oh! What humble delights of gastronomical goodness! What simple joys we are blessed with.

Thursday, September 16, 2010

Pumpkin Carob Chip Mini Cakes

I have discovered my birthday cake. And it is amazing. I can hereby celebrate and be happy!

This recipe I found from one of the blogs I like to follow, and then I altered it a bit to suit the no-sugar and flavor preferences. So if you want the recipe unaltered, here's the link to that recipe, and the awesome blog I love to follow:
http://iamglutenfree.blogspot.com/2009/10/pumpkin-chocolate-chip-mini-bundt-cakes.html

There's another awesome blog, you may have heard of it before, Gluten Free Girl and the Chef. They just came out with a cookbook-I'll be getting it soon from a friend for a birthday present. *YAYAYAYAYAY!* I follow those two blogs and check them each day-they have wonderful recipes for baked goods, meals, occasions, everything. And it's really encouraging to read about other families that have similar challenges with their diets, and how they overcome. If you, or anyone you know are celiacs, and you haven't checked these sites, you gotta check them ASAP!

Last night we celebrated the September birthdays on my hubbies side-his Dad, our brother-in-law, and myself. The cupcakes had dried a bit (which I figured they would, considering the box mix was using ONLY rice flour and tapioca flour) but that's why I made something else sweet to bring. And it was so delicious! Pumpkin carob chip mini cakes. They were so moist and delicious. I love them. Dearly. I used to always want chocolate chocolate chip bundt cake for my birthday-and that's kinda difficult when I can't use that recipe or have real chocolate. But instead, I mixed the next best things into an amazing dessert, and I will be making it again. And again. And again. And again. And maybe sometime I'll reduce the sweet, and make them into muffins for breakfast. Ooh...that IS a good idea! Maybe I'll run to the kitchen to play later.. >_>

 It's a long list of ingredients, but SUPER easy to make! You can make them into actual bundt cakes, mini bundt cakes, cupcakes, whatever!

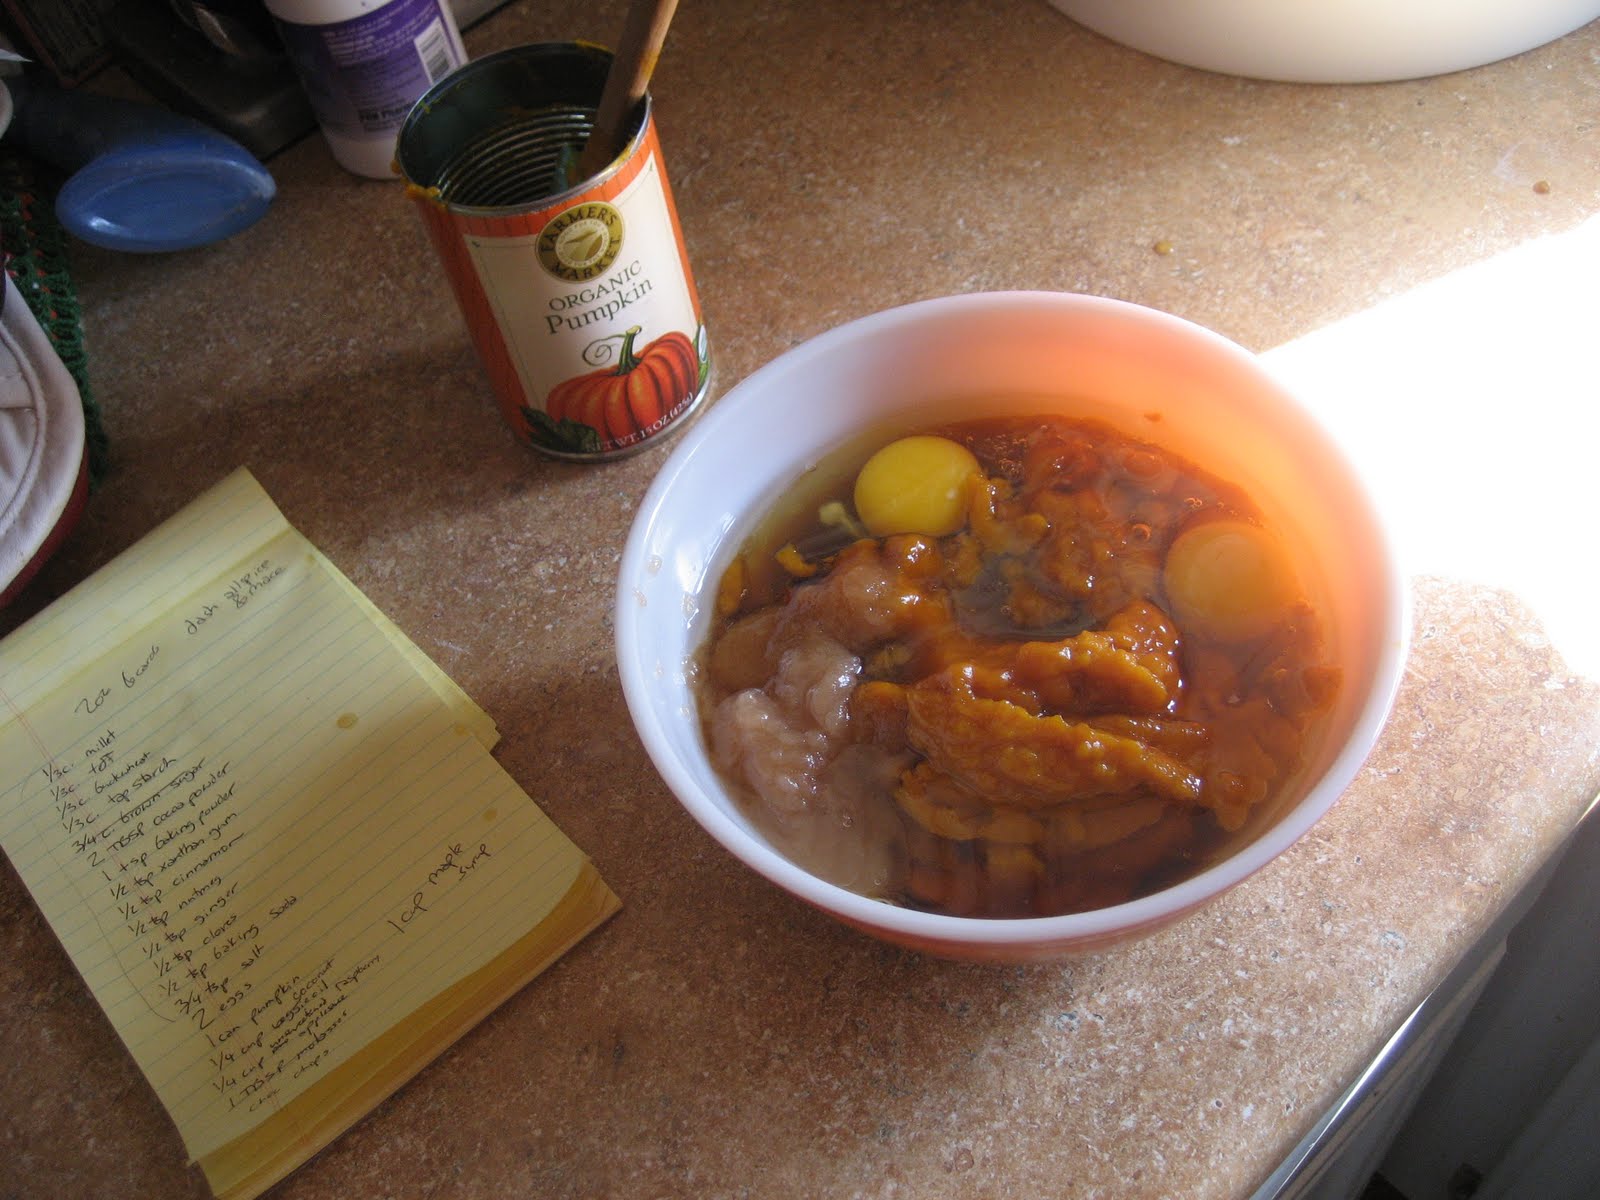
Pumpkin Carob Chip Mini Cakes

2 oz millet flour
2 oz teff flour
2 oz buckwheat flour
2 oz tapioca flour/starch
2 TBSP carob powder (or unsweetened cocoa)
1 tsp baking powder
1/2 tsp xanthan gum
1/2 tsp cinnamon
1/2 tsp nutmeg
1/2 tsp ginger
1/2 tsp cloves
dash of allspice
dash of mace
1/2 tsp baking soda
3/4 tsp salt

2 eggs
1 can pureed pumpkin
1/4 cup coconut oil
1/4 cup unsweetened applesauce (mine was actually raspberry applesauce, but you couldn't tell)
1 cup maple syrup (the original recipe called for 3/4 cup brown sugar)

2 oz carob chips (or chocolate chips)
1/2 oz maple chunks (optional)
  1.  Sift all the dry ingredients together, making sure there's no lumps and it's mixed fully together.
  2. Stir all wet ingredients together and blend fully.
  3. Add wet to dry, and incorporate til smooth. Add in carob chips and stir gently. I added maple chunks to what I made, just for the fun of it.
  4. Pour into pan(s) that are pre-greased. Toss into preheated oven of 350 for about 25 minutes, or until inserted toothpick comes out clean. I think mine took about 30 minutes to fully bake, but mine also had added moisture from the maple syrup.
  5. Cool fully. You can add a chocolate glaze if so desired. I used the same glaze recipe that I made for the scones awhile back.


Sifted flours-not yet stirred up though

Stirring up them flours


<>
Wet ingredients!


Wet ingredients are prepped and ready to be added!

Measure those well!


Poured and ready for some baking-can't wait to see how they'll be!


You gotta admit, those look rather impressive!


With some carob glaze of yumminess!


Moist, pumpkin, carob goodness! Each little cake you see in the pictures is roughly 145 calories and 25 carbs. (I had 15 servings, so that's what it measured out too, feel free to do the math if you make more or less) 

ENJOY!