Thursday, September 30, 2010

The great snack dessert experiments

Graham crackers. Great for pie crusts, snacking on the road, frosting sandwichs and of course, S'mores...they are simply delightful. And also full of wheat, sugar and sometimes even dairy. I wanted to have a frosting covered graham cracker...but I couldn't. And that annoyed me.

So I searched around for a bit, and of course, ended up at Gluten Free Girl and the Chef's blog. I love her posts. And what did I find? An amazing recipe for graham crackers. Hallelujah! I tried it. And it's good. I'll post how to make it here, but you should also check her blog sometime, she's amazing. http://glutenfreegirl.blogspot.com/2010/01/gluten-free-graham-crackers.html

2.5 ounces sorghum flour
2.5 ounces brown rice flour, ground super fine, if possible
2.5 ounces tapioca flour
2.5 ounces sweet rice flour
1 teaspoon cinnamon
1 teaspoon baking powder
1/2 teaspoon xanthan gum
1/4 teaspoon guar gum
1/2 teaspoon salt
3.5 ounces unsalted butter, just out of the refrigerator
3 ounces honey
3 to 6 tablespoons cold water
 
  1. Measure out the flours and combine in a food processor. Yes, flours in a food processor. It's a good thing. Add the remaining dry ingredients and whirl it around until combined.
  2. Cut the butter in. Keep processing until it's fine and gritty. Similar to cornmeal.
  3. Combine the honey and 3 TBSP water in a separate bowl. Add the honey water to the food processor, and blend thoroughly. If it's not a soft and slightly wet dough, slowly add more water until you reach that consistency.
  4. Fridge the dough for about 15 minutes. Preheat the oven to 325.
  5. Get two pieces of parchment paper, and place one on the cookie sheet of choice. Grab that dough from the fridge, and lump it onto the paper'd pan. Place the other paper over it, and roll the dough until it's about 1/4 inch thick. Use a knife to lightly cut the dough into actual pieces. Save the scraps as they are-great for snacking or pie crusts!
  6. If you want to add cinnamon sugar to the graham crackers, now it the time to do it. If not, fridge the pan and dough for another 15 minutes or so.
  7. Bring out that baby and use the tines of a fork to add a little pattern to them. Bake for about 18 minutes or until they reach a lovely golden brown color, and are ever so slightly getting hard to the touch.
  8. Cool them for about 30 minutes or until they harden a bit more.
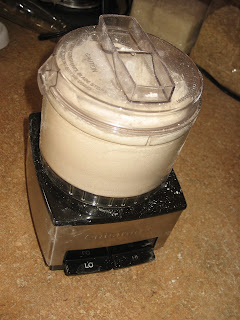
My lovely sis-in-law is letting me borrow her food processor-
she's so sweet!

That's the way you want the dough to look. If you want
cinnamon sugar graham crackers, I'd recommend adding some spice here

You can see I cut them to be s'more sized...Add the little hole decorations
at this point. And if you want them to be cinnamon sugar, add it here too
before you do the final fridging.

When I made them, with the sizes I cut, I made 26 servings, and they were 70 calories and 10 carbs each.

Now for the next step onward for my goal of s'mores. Sugar free marshmallows. I know, it sounds like an oxymoron, right? Well, it's actually quite simple to make, and they are so amazingly sweet! TBG and I were both very pleasantly surprised. And they melt very easily, so I'll be making rice krispy treats soon too. ^_^ I  may as well run with my fun! http://www.ehow.com/how_4735818_sugar-marshmallows-home-recipe.html This is the website I got it from-props to them!

What you need:
2 packets unflavored gelatin
1 cup agave nectar or maple syrup (I used maple syrup this time)
1 tsp vanilla
6 TBSP cold water
1/4 tsp salt

Pam spray
Sweet rice flour (or cornstarch)

  1. Mix gelatin and water in small bowl, microwave on high for 30 seconds.
  2. Add syrup, vanilla and salt. Using a handmixer or a standmixer, beat for 12 minutes, until it's tripled in size and became very thick.
  3. Spray 9x12 pan with PAM and lightly flour it. Pour the marshmallow mix into the dish, and cool in fridge (or counter top) for at least 3 hours.
  4. Cut the marshmallows into whatever size you want, using a wet knife.

I used a stand mixer, it's so much easier!

Use a wet spatula to smooth the top of the marshmallow before it hardens
I cut mine large, for the purpose of S'mores, and so I made 18 large marshmallows, at 48 calories and 12 carbs apiece. These are great for cocoa drinks, rice krispy treats, s'mores, whatever you'd use marshmallow sweetness for!

 We can't even begin to describe the joy our tastebuds experienced. We used carob chips for tonight's S'mores, and my oh my, were these the ultimate treat! Melt the chips on the graham cracker BEFORE adding the marshmallow. The heat alone from the cracker will melt the marshmallow-as you can see at the top of it. Oh man, were these good.

And using the graham cracker small tidbits with carob frosting on them! Oh! What humble delights of gastronomical goodness! What simple joys we are blessed with.

So many foods to blog! So little time!

I have made 6 different recipes that need to be blogged, and there seems to be so little time! I'll probably end up writing only a few at a time. Where to start? I'll start with yesterday morning...Breakfast.

So TBG's schedule changed for work, and now he has to be in at work by 6am. Which isn't all that bad..if you don't mind getting up at 4:30ish. I get up at the same time he does, so we can spend a bit of time together, and also so I can make sure he gets a good breakfast. (now that he can't have dairy either, all the quick breakfast bars we have are of no value at all) I refuse to send him to a long day of work without SOME nutrition in him-and the more, the better!

Scrambled eggs by themselves get old after awhile. Scrambled eggs with steak and/or diced bell pepper can eventually get old too. We can't do breakfast burrito's everyday, so we need another egg dish. Bring in Oyako Donburi. It's actually a Japanese dish, and is great for breakfast, lunch and dinner. It's filling and healthy, and we love it. I will admit though-with breakfast happening at 5am, I'm not requiring us to eat with chopsticks like I usually do with asian dishes. Lucky TBG.

I like to serve Oyako Donburi with rice, as it should be served traditionally. (sticky rice goes with it best) So what is this Oyako Donburi? Chicken, veggies and egg. Amazingness in our mouths. ^_^ I halved the recipe, and we had it for two mornings (it actually reheats really well too!) But the original recipe is what I'm listing, and it makes enough for 4-6 people, depending on how hungry you are.

What you need:
2 tsp EVOO
3/4 pound chicken, diced or in slices, your preference
1 small onion, diced
1 zuccini, juliened
1 carro, juliened
1 cup chicken broth
6 dried shiitake mushrooms, slice and soaked in water
4 TBSP soy sauce
1/2 tsp salt
1/2 cup diced green onions
6 eggs

Heat the oil in a skillet, and cook the chicken and onion. It'll take 5-7ish minutes. Drain the liquid as much as possible.

When my chicken starts frozen, I toss the whole thing in, and then bring it out to slice into strips
 when it's halfway done cooking. Then I toss it back in to finish the job.

Stir in the broth and simmer for a few minutes. Add veggies. Stir it around a few more minutes before adding the salt and soy. Sprinkle in half the green onions.

I sliced my veggies at midnight the night prior, so I wasn't about to use my
mandolin slicer. Bad idea, mandolin slicer at that hour. So my veggies are a thicker
slice, which is actually really nice at early morning hours to eat!
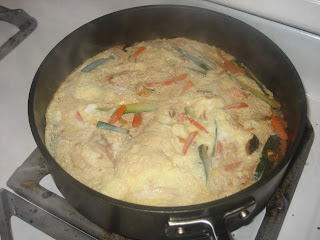
Beat your eggs in a separate dish, as if you were going to scramble them in a moment. Then, pour those eggs into your pan! Pour them around the whole dish, and try to get eggs to cover everything. Cover with lid, so moisture doesn't escape too much. (also speeds cooking time)

This is what it looks like when almost done cooking

I'd say it takes about 8 minutes or so to cook through. Just look into the pan and see if the eggs look done. It'll depend on how high your heat is. For the above pan, I had the heat on medium high, and it was done in 5 minutes. Just keep an eye on it. Serve with rice.

You can see the rice peeping through under it..so good!
Roughly 235 calories and 11 carbs for the Oyako Donburi. Doesn't include the rice.

Skipping around, meal-wise, we'll go to tonight's dinner. TBG felt inspired after my blackberry glazed salmon, and was intrigued to try a raspberry maple glaze for beef. It was really good! We had some leftover mashed potato's from last time, so I served sirloin steak with raspberry maple glaze, mashed potato's and broccoli. He has great ideas, my man.


First, the meat:

We're trying to portion control, so we each had our own smaller slice of meat.
Which is actually a lot better for us, than when we'd make a HUGE hunk of meat and split it..
I wanted to sear the meat a bit, so I sprinkled a bit of salt on both sides of my meat to prep them.


I love cast iron skillets. Great for stove top AND oven use!
I used peanut oil-enough to cover the pan. Heat the pan until it's
so hot the oil ripples. You know you're ready then.


Flipped it. Smelled so insanely good!
After searing both sides (or all sides, if you prefer) toss it in the oven to finish cooking while you work on preparing the other food. I had it in the oven for 10 minutes at 350. 

Once they came out. Drain them well.
While the meat was searing on the stove, I had a small saucepan that was heating up. I used that for the raspberry glaze.
6 oz fresh raspberries. Mmmm...
6 oz fresh raspberries. Add just enough water to cover them all. Bring to a boil, and then lower it to a simmer. We want them to all burst.


Boiling

It's so pretty!
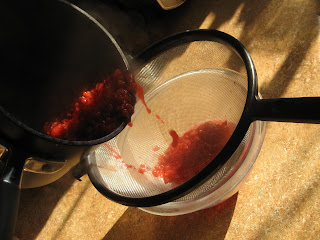
Time to grab a strainer and a separate bowl.

I LOVE the colors of the raspberry. So incredibly gorgeous!
Strain the juice from the pulp. Put the juice back into the pan, with low heat. Add 1 tsp maple syrup, and stir until it's combined. If you want to thicken it, use corn starch or arrowroot to thicken it up a bit.


Serve over meat. And add as much as you want! Enjoy!

Saturday, September 25, 2010

Inspiration comes from odd places at odd times

Dinner was amazing.

My random idea became a hit with my hubby, it's a winner. All because I saw that butternut squash lying on the counter next to the fridge. Am I glad I run with my crazy ideas!

So this morning before I went to the gym, I was cleaning up the kitchen and trying to decide just what I wanted to do for dinner, when I noticed a small little butternut squash next to my fridge. It had been there for maybe two weeks now, and somehow just hadn't made its way into our fridge! One of our neighbor friends had traded us two butternut squashes for all our sugar (that I can't eat anymore) and most our flour, chocolate chips, and other baking supplies that have been in the kitchen mocking me. (I feel like I got the better part of that trade) So it's been sitting there, waiting patiently for whenever that crazy girl would get around to cooking it. Well, today was the day.

I went on my merry way to the gym, but that squash stayed in the back of my mind, teasing me with different ideas for dinner. I've been given several good recipes to do for squash-recipes with it being the main dish, and others with it as a side dish-but I didn't want to do anything different with the squash today. No, I knew i wanted pork chops with it. Upon arriving back at home, I check the freezer to see if I have any pork chops on hand-voila! I did! But they looked like they might be a tad bit frost bitten. And I wanted my pork chops tender as can be and juicy. My shower was spent cogitating on recipes that could add juicyness.

While still thinking, I decide to run over to Sprouts to get some groceries that I've been needing. I'm a little perplexed at this point, because all the recipes I want to do, I can't, as they all have some type of bread crumb crust or brown sugar added. Then I walked through the produce aisle. And I noticed these gorgeous green beans. And when I say gorgeous, I mean GORGEOUS! They were a vibrant green, without the sad little nicks and dings you'll find on green beans at most grocery stores. It hit me then. I grabbed several handfuls of those amazing beans and made my way to the checkout.

My idea was simple, and in that, it was rather genius. I typically cook my pork chops in a pyrex dish with foil wrapped over the top. Following that idea, I used foil across the inside bottom of the pan, and had extra up and over the edges. Laying my two pork chops in there, I added my seasonings and then folded up all the edges (leaving a very small steam hole) and curled it all in on itself, so moisture would stay in. Baked that and my squash for a bit over an hour at 350, steamed the beans, and served. We melted in our chairs. And all dinner conversations ceased as we solely focused on our meals.


See how I have the foil? That's a *new* trade secret to moist pork chops...


What was this seasoning? Simple stuff. You need however many pork chops that you want to serve. For the ingredient list, this was for two chops:

-1/2 cup unsweetened applesauce
-2 tsp cinnamon
-dash of nutmeg
-1/4 cup pure maple syrup

Simple stuff. I dashed cinnamon (and a tad bit of nutmeg) over the chops once they were in the foil and pan. I took a spoon and carefully spread the applesauce thickly over the tops of both chops. Dash again with a bit smaller amount of cinnamon. Pour maple syrup around the chops, and lightly drizzle a tiny amount over the chops. Curl up foil and bake. Once it's done, and bring out the chops and put them on their respective plates, lightly sprinkle more cinnamon, and drizzle maple syrup over them again. (however much you'd like for that, I used about 1 TBSP each chop) Serve.

Notice how thick the applesauce is! That's for a reason!

And behold what it looks like coming out of the oven...
Both our mouths were watering so badly!
 The leftover sauce that was in the foil/pan I also used a small amount of. The flavor is reduced in that sauce, but I took a spoon and lightly drizzled that liquid over the butternut squash quarters on our plates. No butter or salt needed. The green beans got the lightest of brushes with butter before being served to the table.


It was so amazing tasting! Next time maybe I'll make up some fresh
rosemary rolls to alongside it all...

Pork chops come in all different sizes, so I'm not including that in my recipe calories/carb calculations for here. If you use the recipe for the sauce I posted, and split it between two people, it's about 120 cal and 30 carb. But that also depends on if you use all that liquid in the pan after, and if you eat it with the applesauce still on the pork. (which is how it should be eaten!)

  So that has become a new autumn favorite in our household. Now for me to decide what I want to do for dessert with the strawberries I have... ^_^

Carb and protein yummy breakfast

This morning I was having a major craving for fruit smoothies, so I had no choice. I had to make fruit smoothies with breakfast. ^_^ TBG didn't have any complaints against it.

 I used a different blend of fruits this time, I really enjoy just throwing fruits into the blender to see what happens. But I did remember to measure them out first-how else would I get an accurate carb and cal count?-so I can actually post the recipe.

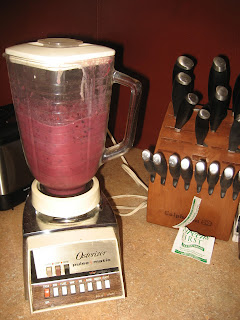
Blend it up baby!
Today's yummy-licious smoothie was made with all frozen fruits, as usual. I'd suggest running out to the store and grabbing up the rest of the seasons fresh berries while they're ripe and fresh and in season. I just bought more strawberries to take care of, and I need to finish freezing blueberries this week. Hoping to get more cherries while I still can!

5 oz blueberries
3 oz cherries
5 oz strawberries
100 grams unsweetened, plain, disgusting-by-itself yogurt (the more gross by itself, the healthier it is)
8 oz grape juice
2 ice cubes
1 Greens First packet (additional protien/veggie supplement-optional!)

Blend it up! I typically blend, stir, blend, stir, frappe, stir and serve. Serves 2. 167 calories and 36 carbs each.

I was impatient and already started drinking mine..
His drink, before it got devoured!
Now, any good breakfast should have protein, and I like my protein. So I used some leftover steak from a previous meal to make an omelette. (I'm practicing my omelette skills right now, I'm HORRIBLE at flipping those suckers!)

We are blessed with fresh eggs from my Mom-in-Law, and we
love the different color eggs we get from her many different chickens!
I used 4 eggs today-2 eggs each when I split it evenly.
I've discovered for ease of cleaning the pan after, and for ease of flipping my
wanna-be omelette, it's best to butter the pan first. I just use a basting brush
and butter a thin layer EVERYWHERE there may be egg. You never know when it's me..
I cracked the eggs in a separate dish and added half an eggs worth of hazelnut milk,
stirred well, and tossed it in. After the bottom was getting cooked for a few minutes,
I lifted the edges of the egg to allow more raw egg to go under and cook. After doing that
around all the edges I added the 1.5 oz of steak you see up there. Sprinkle salt and pepper
Not the worst flipping job. Not the best.
TBG came by with our fuzzy daughter-she's not a huggy kitty.
But we like to hug her anyways! Poor Malificent...
You can tell that Sephiroth is trying to hug back here.. >_>
After Sephiroth was put back on the floor, our 3rd child, Earl, was
safely hiding under the entertainment system. *sighs*
YUMMY!
A good, hearty breakfast. Something like this will last me from 6:30am to about 11:30ish or so, which is a great thing for long days! Munch on some almonds and pecans and I can last longer from that point. Food strategies. They can work well. ^_^

Tuesday, September 21, 2010

A lovely Tuesday with an amazing dinner

I think I just made one of my top meals just now. Seared salmon with blackberry sauce (remember that sauce I made back in the unlikely yummy dinner? That sauce.) Golden mashed potato's and ginger/garlic carrots. Oohhh... TBG and I were rather quiet during dinner, slowly savoring the flavors and textures. A good end to the day.

Today was a lovely morning at the ladies Titus 2 Bible study. We start classes in two weeks time, and I'm super excited to meet more ladies there and get to make even more new friends. Our teacher was out of country for this week, so one of the other leader ladies spoke. Such a wonderful encouraging and convicting topic! The Armor of God and the methods of attack that Satan uses. It was very interesting, hearing her break down methods that Satan uses to break our spirits and turn us away from our Father. It was so true too! Think about it, how often does something of either of these get in the way of focusing on our Savior?
1.>Doubt
2.>Deception
3.>Discouragement
4.>Division
5.>Delay
6.>Distract
It was interesting, because I could immediately identify the attacks I am susceptable to. Discouragement. Delay. Distract. Especially in the last month or so, I'm so easily discouraged by things I can't eat. And I turn from thanking the Lord for the things I CAN still eat and for the tastebuds I have, to crying over the few things I can't have. And I can have so much in reality! Delay and distract go hand in hand for me. I'll put off Bible reading to quickly change the washer/dryer, and then I'll reply to a text, and then remember to empty the dishwasher, and then I need to get ready for work, and then and then and then... Again, it was encouraging and convicting.

After she went over the methods of Satan's attack, she went into the Armor of God, and starting each day with putting that on. She also broke down the Armor, and reminded us of what each is and how important every piece is. I plan to get the CD once it's available next week. Yay! I think they have podcasts now too..I should look into that...

Anyways, Titus 2 was great. After that, I invited my Mom over for lunch, and we enjoyed a lovely pasta dish with turkey meat sauce, steamed broccoli, and fresh garlic bread. Such a wonderful time of fellowship and catching up! It is truly amazing to me, how much we've both changed. From a strictly mother-daughter relationship, to a mother-daughter-friends relationship. Amazing what marriage and moving out and maturity can do! I am very blessed to have the Mom that I have, and I am even more blessed that she'll still talk to me after all the stress and annoyances I put her through after all these years! *laughs* I'm glad she was available to come over and hang out.

And to add a cherry to the icing of today-TBG got off work slightly early today! Granted, it's because his leg is randomly really sore, and he didn't want to injure it any further, but still, what counts is that he came home by 4. ^_^ We were actually able to have dinner at 6 sharp, and still have time for some video games before that. He got the video game Final Fantasy 13 for an anniversary present, so he's enjoying playing through it, and I'm enjoying watching the story unfold! It works well, our nerdy amusements..

I'm afraid to say that I don't have any pictures of dinner. The camera is somewhere downstairs in his truck, and neither of us felt any inclination to go downstairs and find it. So sorry. But I will make it again sometime soon, seeing how amazing it was, and when I do, I will take pictures then! The salmon I've talked about before. Pan searing a salmon fillet that's only been seasoned with salt and pepper, and then pouring that blackberry glaze over it after. Delicious. But then I made something that I've made countless times before, but this time with different ingredients and different methods.

 Mashed potato's. Oh, so, so good!

For my birthday, I received the new gluten-free girl and the chef's cookbook. I highly recommend this book.To anyone and everyone. You do NOT need to be a celiac to enjoy this book. The recipes are superb. The story is sweet. And there are so many yummies in there to make! Huzzah! I will admit that for the mashed potato's , I had to sub out some ingredients for us, as now neither of us can have dairy, but they turned out fantabulous anyways! I'll post the recipe as I made it, but I'll also include the page number of their cookbook that I found it in. You have GOT to try these sometime! Totally worth the effort!

4 Yukon gold potato's, peeled
1/2 cup salt
1/4-1/2 cup hazelnut milk
4 TBSP softened butter
1 TBSP EVOO
salt and pepper to taste

  1. Cut the potato's in half lengthwise, about an inch thick for each slice. If there's tiny slivers of potato left over, save them for some other cooking project later. We want these the same size so they cook through in the same time.
  2. Add enough COLD water to the pot to fill it. Use a big enough pot that the potato's will have room to float and bounce around, no small pots that they barely fit in. Add the 1/2 cup salt. We want the water to taste like the salty ocean. Add more water if needed. Then add the potato's. Bring the water to a boil, and reduce heat to simmer for about 10-15 minutes, or until you can slide a knife through the potato's easily.
  3. Pour the potato's into a large colander and shake to get all the water off. Let them sit a minute or two to steam dry.
  4. If you have a potato ricer or food mill, then you're in luck. Do it the easy way. If you're like me and you don't, then grab your strainer or fine mesh sieve and start pushing them potato's through! I used my strainer and a wooden spoon to push them through.
  5. Add the butter, and fold in the hazelnut milk and EVOO. Add some fresh ground pepper. Taste, and salt/pepper to your preference. You can add fine chopped fresh chives if you so desire to.
I took pictures on Thursday, when I made it again, so here's a few shots:
Potato's!

See how they're all cut the same thickness? You want them like that
So tender, and so soft and amazing and flavorful! And when some of that blackberry glaze soaks into the potato?... *drools* You don't want to know the calorie count. Honest. But if you're like me and counting calories and carbs, then the recipe above makes 4 servings, 333 calories and 32 carbs each. *winces* I know, but the taste is worth it! Just plan ahead so your breakfast, snack and lunch are low cal and low carb to help balance the day..

Then the carrots. Steam the carrots like you always would, then just add a quick dash of ginger, a quick dash of garlic, some butter, stir and serve!


Carrots like this are a weakness to me now. Cook em and inhale em!

I'm thrilled we have some leftovers, because oh my am I going to enjoy dinner on Friday! (Friday, because tomorrow is a date night to Red Robin-yay!!-and Thursday I told TBG to have a friend over for guy time. Which works, because then I can use that friend for taste testing. ^_^ I like when we have friends over) Dunno what I'm going to make for when he's over, trying to decide. I'm thinkin a new recipe, just don't know WHICH new recipe yet. We'll see...

What a great Tuesday! Now to figure out what to do for my lunch tomorrow.. Whenever I make the salmon and potato's and carrots again, I'll make sure to take pictures to post. Promise.

Best fish ever!

Thursday, September 16, 2010

Pumpkin Carob Chip Mini Cakes

I have discovered my birthday cake. And it is amazing. I can hereby celebrate and be happy!

This recipe I found from one of the blogs I like to follow, and then I altered it a bit to suit the no-sugar and flavor preferences. So if you want the recipe unaltered, here's the link to that recipe, and the awesome blog I love to follow:
http://iamglutenfree.blogspot.com/2009/10/pumpkin-chocolate-chip-mini-bundt-cakes.html

There's another awesome blog, you may have heard of it before, Gluten Free Girl and the Chef. They just came out with a cookbook-I'll be getting it soon from a friend for a birthday present. *YAYAYAYAYAY!* I follow those two blogs and check them each day-they have wonderful recipes for baked goods, meals, occasions, everything. And it's really encouraging to read about other families that have similar challenges with their diets, and how they overcome. If you, or anyone you know are celiacs, and you haven't checked these sites, you gotta check them ASAP!

Last night we celebrated the September birthdays on my hubbies side-his Dad, our brother-in-law, and myself. The cupcakes had dried a bit (which I figured they would, considering the box mix was using ONLY rice flour and tapioca flour) but that's why I made something else sweet to bring. And it was so delicious! Pumpkin carob chip mini cakes. They were so moist and delicious. I love them. Dearly. I used to always want chocolate chocolate chip bundt cake for my birthday-and that's kinda difficult when I can't use that recipe or have real chocolate. But instead, I mixed the next best things into an amazing dessert, and I will be making it again. And again. And again. And again. And maybe sometime I'll reduce the sweet, and make them into muffins for breakfast. Ooh...that IS a good idea! Maybe I'll run to the kitchen to play later.. >_>

 It's a long list of ingredients, but SUPER easy to make! You can make them into actual bundt cakes, mini bundt cakes, cupcakes, whatever!

Pumpkin Carob Chip Mini Cakes

2 oz millet flour
2 oz teff flour
2 oz buckwheat flour
2 oz tapioca flour/starch
2 TBSP carob powder (or unsweetened cocoa)
1 tsp baking powder
1/2 tsp xanthan gum
1/2 tsp cinnamon
1/2 tsp nutmeg
1/2 tsp ginger
1/2 tsp cloves
dash of allspice
dash of mace
1/2 tsp baking soda
3/4 tsp salt

2 eggs
1 can pureed pumpkin
1/4 cup coconut oil
1/4 cup unsweetened applesauce (mine was actually raspberry applesauce, but you couldn't tell)
1 cup maple syrup (the original recipe called for 3/4 cup brown sugar)

2 oz carob chips (or chocolate chips)
1/2 oz maple chunks (optional)
  1.  Sift all the dry ingredients together, making sure there's no lumps and it's mixed fully together.
  2. Stir all wet ingredients together and blend fully.
  3. Add wet to dry, and incorporate til smooth. Add in carob chips and stir gently. I added maple chunks to what I made, just for the fun of it.
  4. Pour into pan(s) that are pre-greased. Toss into preheated oven of 350 for about 25 minutes, or until inserted toothpick comes out clean. I think mine took about 30 minutes to fully bake, but mine also had added moisture from the maple syrup.
  5. Cool fully. You can add a chocolate glaze if so desired. I used the same glaze recipe that I made for the scones awhile back.


Sifted flours-not yet stirred up though

Stirring up them flours


<>
Wet ingredients!


Wet ingredients are prepped and ready to be added!

Measure those well!


Poured and ready for some baking-can't wait to see how they'll be!


You gotta admit, those look rather impressive!


With some carob glaze of yumminess!


Moist, pumpkin, carob goodness! Each little cake you see in the pictures is roughly 145 calories and 25 carbs. (I had 15 servings, so that's what it measured out too, feel free to do the math if you make more or less) 

ENJOY!

Wednesday, September 15, 2010

Cupcakes!

So I made cupcakes last night for Bible study and for family birthdays today...yummy! I liked the box mix, but I think I will aspire to make my cupcakes from scratch. The flours for the box mix were predominantly rice flour and tapioca flour, and I've discovered that just those two flours can give baked goods a bit more "chew" than normal baked goods. (next time, I may add some teff flour for good measure) But that's not what's important right now.

I made sugar free frosting. And it's delicious.

Granted, I used coconut sugar and powdered maple syrup, but that doesn't matter. What matters, is that my cupcakes are not naked cupcakes! And the frosting tastes soo good. If I can find a donut recipe, I have my frosting. I found a graham cracker recipe, so on those need-something-sweet moments I can now have frosting with them, when I make a cake, I have a frosting for it. I HAVE A FROSTING!!!!!


Yes, it's a Halloween paper. I realized I ran out of birthday wrappers, ok?
But what matters is that frosting. I have maple chunks for sprinkles on mine. ^_^
 Admit it, it looks good. That's because it IS good. How did I make this amazing, delectable frosting? Chaotic baking and subsitutions.

My poor kitchen was quite the mess
I'm glad I had organized the day prior so I had so much space!

But I'll totally say it paid off!
And you can make it home too!


Chocolate Frosting of Gastronomic Goodness
1/2 cup carob powder
2 heaping spoonfuls of unsweetened cocoa powder
1/4 cup melted, unsalted butter
1/3 cup coconut milk
1 tsp vanilla
1 2/3 cup coconut sugar
1/3 cup powdered maple syrup


Melt the butter and blend powdered carob and cocoa. Smooth out as many lumps as possible. Remove from heat. Slowly add in vanilla and milk, stirring as you go. I'd recommend sifting the sugars together, and then slowly adding them into the carob mix. Grab a hand mixer and blend on high until smooth. This could take awhile. What I did was blend on high for about 4 minutes, then I turned it off and walked away for half an hour. Came back and blended again. Use for frosting, and any leftovers can go in a tupperware in the fridge for a later date. Enjoy!


I used up the last of the store bought frostings for the two leftmost cupcakes colors,
and then the chocolate cupcakes on the right are for me. So glad I found something that works!

And I did clean up the kitchen eventually...

Without flash. And yes, that there is Christmas paper. I also had Valentine's Day wrappers...